Metering is where the camera is trying to find the 18% average grey midtone so the rest of the light and dark exposure fall into place. (Hilights account for 75%, Dark/Shadows 5%) The camera has three metering method.
Evaluative or Matrix metering
Takes exposure information from every part of the frame area and considers which focus points are active to work out where the subject is. Many photographers rarely use anything else.
Centre-Weighted/Partial
Perfect for portraiture, all the attention is on the centre of the frame decreasing the information to the outside of the shot.
Spot metering.
The camera only takes exposure information from a small “target”. 2-5% of the frame. If you metered on the white then that would be seen as the midtone and everything would be darker and under exposed. Similarly metering on a black would be too bright and bleached out.
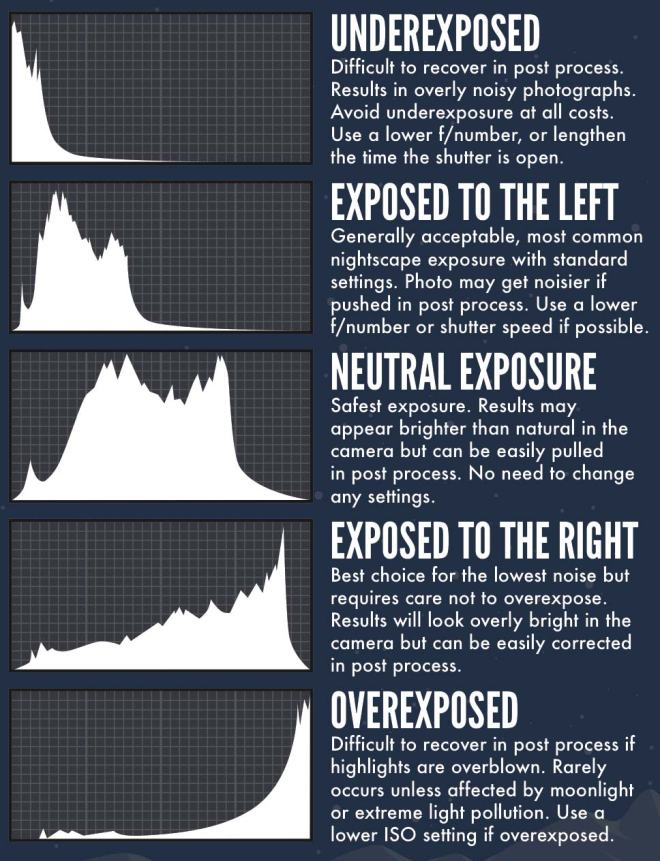
A histogram is a graph to display tonal values of the exposure in an image.
256 Bars of colour information form curves which can help you tell if your image is exposed correctly.
I found a little chart which I think summarises what we discussed in class. I think it’s really helpful to have a tool on the camera which will help point you in the right direction in terms of exposure.
In some occasions it’s okay to clip the black and white though. For example you would have to clip the black in a silhouette shot, and similarly have to clip the white in a high key, white backdrop photo. On a grey foggy day the histogram would be sat bang in the middle in midtones.
If you are slightly under or over exposed in Manual Mode you can use Exposure Compensation, which can be seen below.
These are some examples I took around college using exposure compensation keeping the f stop and shutter sped the same but changing the exposure compensation -2, 0 and +2.
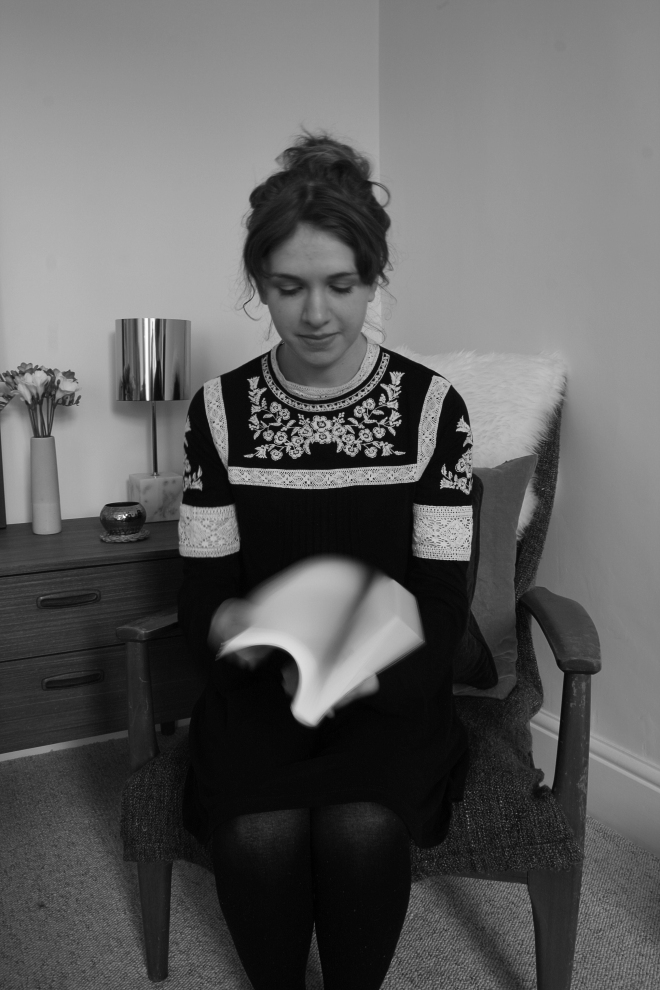
The idea behind this shot was to show the movement of pages as the reader flicked through cover to cover. I knew I’d need a reasonably lit room, (but not over bright to avoid over exposure) and a tripod to ensure I wouldn’t have any camera shake. The location was at home; I love this old chair I acquired and always think of the corner of my living room as reading corner. I bought the sideboard at the weekend too, so great to include it!
Shooting:
I did some initial test shots from, seen below. The first three were off the tripod to gauge exposure. The first was very dark but I soon realised this was because I’d left the metering on from the bubble shoot I’d done outside in the bright sunlight. I tried a revised shot where the metering was set to 0 ISO 100 for maximum sharpness, and the shutter at 5 seconds; I knew this would be too long but just scrolled to get an idea. I soon moved onto 1 second; the aperture automatically setting itself to f8 as I was shooting on Tv shutter priority. I then started getting the subject to move the book. Once I’d managed to get her sat at a good angle and flick through the pages we were away!
Evaluation:
I am pleased with the final shot, which I changed to black and white as I felt the colours in the room were distracting. Now the pages of the book pop against the models black dress. In retrospect clearing the side board and just having the chair on a white background would mean there was less distraction also. I could have tried a version with a fast shutter speed which would have frozen the pages as they passed or a zoomed in option, with the focus solely on the book and other elements out of focus.
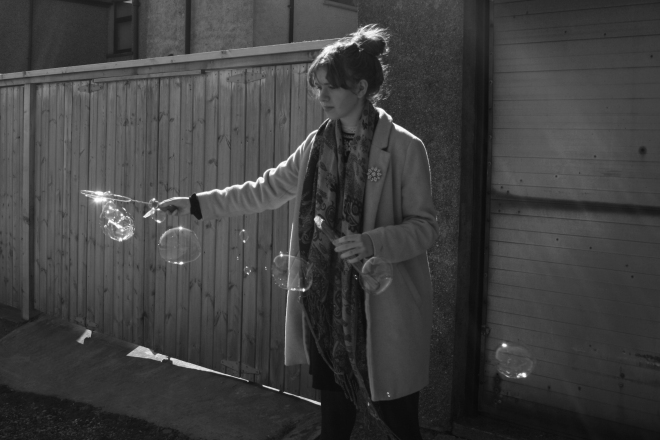
Capturing the creation and movement of bubbles using a fast shutter speed. I needed a nice day, bubbles and an assistant!
Shooting:
So I headed to a little communal plot of land where I though bubbles against trees, grass and blue sky would work. No. There was way too much distraction with the textures, so much so you could barely see the bubbles. We then moved to a stone wall which was dark enough to make the bubbles stand out but still quite distracting! We then tried a back street with bright blue sky and a green hedge, but again, too distracting, even though the colours were lush. Eventually I found that standing in some shade and letting the sun shine from behind gave the bubbles some really bold shapes and hi lights which is what I was aiming for. I was also up against another issue, the wind! It was forcing the bubbled to move even quicker than they already do.
I shot on Tv shutter priority at ISO 100, however it was such a bright day and the shots were slightly over exposed so I decided to minus the exposure to -0.33, which gave a darker, more successful exposure not at the expense of the shutterspeed. This metering runs throughout all the shots seen here. I initially started the shutter speed at 1/320 which can be seen on the conifer hedge shots. However I felt as though the bubbles weren’t quite sharp enough, probably due to the wind pushing them along at speed generating some motion blur. I decided to up the shutter speed to 1/500 which seemed to be giving me a better frozen moment effect, capturing the shapes forming and elimination motion blur. These can be seen in the bottom 6 test shots.
Composition Test Shot
Composition Test Shot
Composition Test Shot
Test Shot ISO 100 18mm f6.3 1/320
Test Shot ISO 100 18mm f6.3 1/320
Test Shot ISO 100 18mm f4.5 1/500
Test Shot ISO 100 18mm f4.5 1/500
Test Shot ISO 100 18mm f4.5 1/500
Test Shot ISO 100 18mm f4.5 1/500
Test Shot ISO 100 18mm f4.5 1/500
Test Shot ISO 100 18mm f4.5 1/500
Evaluation:
Below are my final shots which capture the formation of the bubbles and how they are moving along. I love how everything looks so slow and still here, when in reality it was all over in a flash, the wind picking up the bubbles and taking them away in a blink. The 1/500 shutter can take credit for this. I’ve managed to capture the bubbles leaving the wand and some little splashes of the mixture falling in between. I’ve kept the assistant cropped slightly in shot so it feels in context. I would like to get some shots of single bubbles with more detail on a simpler background. To do this I think I’d have to chose a less windy day!
ISO 100 18mm f4.5 1/500
I’ve also kept a full size shot, which I think works nicely in black and white too. I like how the rays of light are coming in on the right of the photo, adding some atmosphere and whimsical features to the image. I also like how it changes the subject to the assistant; my sister, and the bubbles as a prop.
I think the best way to improve would be to consider a more attractive location maybe at the beach where there’s more sky. However, I quite like how the current shot has resulted in a juxtaposition of a grungy back street with an innocent, nostalgic activity.