Dairy – Eggs. Final Shot

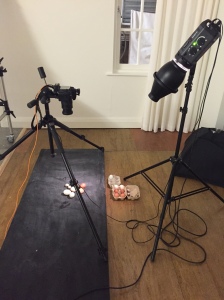
After looking at David Griffen‘s egg photography I decided to recreate something similar in the studio at work. I purchased an array of different eggs and found a black chalkboard backdrop. I used the Nikon D600, a tripod to shoot top down, a flash lamp, initially with a soft box but later moved onto a kicker with a nozzle creating a spotlight. I connected the camera to the Nikon software on the computer allowing me to look at the shots on screen.


image1
Set up

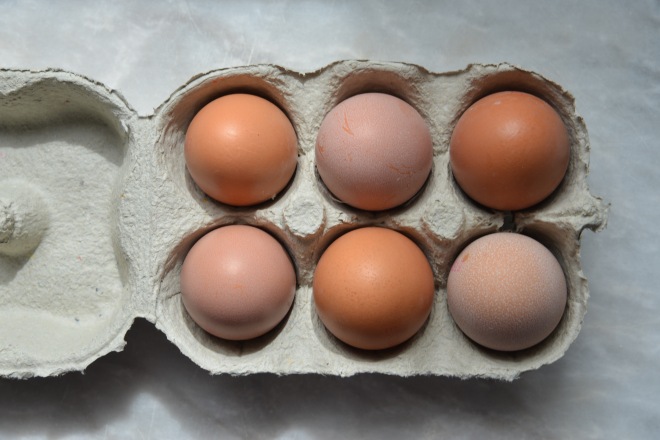
Below are some initial test shots, the first two using a soft box that was too strong even with the flash turned down. It was also creating less of a spotlight style glow and just fully lighting the scene. The ISO was 160 and the shutterspeed 1/125 which is a go to speed when using the flash gun. I varied the aperture, initially f8 but soon realised I needed to up to around f14-22 to get a shot with everything in focus. I took around 78 shots in total but have just picked out a few to show my progression and test shots. I started to become happy with the shot by the time I got to the bottom right shot. I used a fill board here to light the side of the eggs, but the lighting here is still a little too bright, it doesn’t feel moody enough.

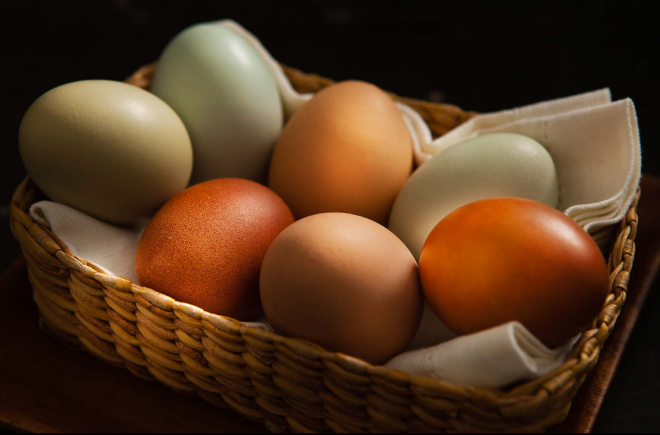
I ditched the fill board and managed to get a shot that still had enough shade around the egg but wasn’t too dark. I’m really happy with the below shot, I like the spotlight effect catching the composition but taking it to darkness around the edges. I took the NEF files into Photoshop RAW to enhance certain hi lights and increase the exposure slightly, although had to be careful as it could bring the background too light and make the image look flat. I also retouched the date stamps off the eggs.

Eggs024RT

Once I knew I had a final shot I was happy with I thought I’d mix up the eggs a little bit and add some duck eggs to break up the colours. I was limited with time as I was using the studio on my lunch at work so started to play around with a totally new composition. However, the flash lamp started playing up and I ended up shooting at 1/60 and 1/20 of a second even though the flash was going off, 1/125 was just going all black. If I had more time I would have got a colleague to help me figure it out, but at that time I just worked with what I could. I abandoned the new composition, which was really nice and if I was to do it again would pursue this, but I went back to the same composition I had above, which still works really nicely with the different colour eggs.


I took the NEF file into camera RAW and enhanced the exposure, hi lights and whites as the shots were really dark after having issues with the flash gun. Again, I’m really happy with the below shot, I think the dark background really helps make the eggs pop.

Eggs054RT


In hindsight I would have probably increased the ISO for all the shots as I was shooting with high f numbers to get a wide depth of field, keeping the shutter the same (ish) with the flash gun. I just had in my head that ISO 100 would be needed for optimum sharpness, but the Nikon D600 would have allowed me to push he ISO was above this and still get a really good shot but have more sensitivity. I forgot about the exposure triangle because I was so aware of time. However, now knowing that you can rescue sots in Lightroom and RAW I knew that I would have something to work with.

Dairy – Eggs. Final Shot

Protein – Fish. Test and Final Shot

Thinking about protein. I was initially going to get some meat (being a butchers daughter!) But I know how hard it is to make meat look interesting/nice/appetising. So thought I’d go for a more interesting subject, fish. I hi-lighted the Helen Cathcart image in previous research as something I really like. I think the texture of the fish against the steely grey background and hi lights of ice works really well. Her shot looks as though it’s been done in the studio with some soft lighting.

GH9A8831LemonSole_low
Inspiration – Helen Cathcart

However, I couldn’t get in the studio during lunch this week so had to create in daylight in my living room. I used a mirror to maximise some light and also an A4 pad to act as an extra fill and create extra hi lights. I used a Nikon D600 with macro lens on a tripod and worked top down.

image2
Set Up

I started by trying to get a decent exposure. I wanted a decent quality so started on ISO100 and knew I’d have to have a reasonably slow shutter speed starting at 1/40 and moving down…


I continued to work through different settings to get the optimum exposure which took some time. I think the lighting was proving difficult as I was getting some heavy hilights even though I was blocking some of the light out at the window with greaseproof paper. I moved the set up around to get some different light angles.

In the end I managed to get a nice sharp image with some nice shadows and hilights in the ice and a good blue hue along the top of the fish by using the fill board to shine light along it.

Using f 10 ensured I had a good depth of field but I had to increased the ISO to 200 and as the sun was in and out, increase the shutterspeed to 1/60. I took the final image in to Photoshop RAW filter and increased the temperature to a cooler blue hue enhancing  the fishes natural colour and habitat. I also homed in on the yellow hilight that features on the face and increased the saturation and contrast allowing it to really pop out and work together with the blue of the fish. I worked in on some of the hilights and brought them down as they were very prominent. I also increased the exposure on the face of the fish allowing it to stand out a little more.

DSC_3705_RT3
Final – ISO 160 56mm f10 1/6 Macro Lens

Overall I’m quite pleased with the final shot given it wasn’t done in studio conditions. I think the hilights are still a little strong though, but the scales are predominant and glistening which is something I did want to capture.. It’s quite a busy shot, maybe a little less ice – although I do really like how the light comes through it.


I tried some different compositions, the fish tail being the focus, some capturing the glittering scales at an angle. However I think the light was too strong and the full top down  version was more effective.


I think my favourite composition of the shoot was the below: I like the half and half composition, it feels as through the fish could almost be alive swimming through the ice. However, I mis-focused and the fishes face is slightly blurry which is a shame. I took the ISO really high here as I moved the fish into a shadier spot to avoid strong hi lights.

DSC_3771
ISO 5000 56mm f10 1/80


I took a shot of a similar composition which is in focus and captures the detail much better. I focused in the eye as you would a human portrait. I took this image into light room to tone down some of the hi lights and bring out the white of the mouth and yellow of the ‘nose’.

DSC_3776RT
Final Shot 2. ISO 5000 56mm f10 1/80 Macro Lens

If I was to do this again I would definitely try and consider where the point of focus is as I’m really disappointed that I didn’t quite get it right on the other shot – I probably would have used this as one of my finals. I think I would take the fish into the studio and use a soft box to gain some softer lighting, however overall I’m pleased with the final shots in the daylight.

Protein – Fish. Test and Final Shot

Carbohydrates – Pasta. Test & Final Shot

Food group, carbohydrates. My favoutite sort, pasta.

I started by looking back at Francesco Tonelli’s pasta shots which were top down focusing on the texture and detail of the raw ingredient. I was using my own Canon EOS for this shot which felt like a step backwards after using the Nikon D600 and D800 from work, but the principals are still the same regardless of the camera.

I was in a well lit room on a dismal rainy Sunday afternoon, which works well as sun and blue skies aren’t always the best for photography, something I’m learning!

I knew that because I wasn’t using a tripod I would have to be cautious of shutterspeed and camera shake so started with the ISO high at 800. I used aperture f5.6 to allow as much light to get in the lens as possible without having the shutterspeed so slow I’d get camera shake. I started at 1/50 and moved down to 1/25 which sees the best exposure out of the 3 shots below. I like the composition of the yellow pasta against the Italian looking marble and think the right image is successful capturing linear texture, but doesn’t feel very creative in terms of utilising the skills I’ve gained.


Whilst shooting I decided to check out Pinterest for some pasta depth of field shots and came across the below image which was originally pinned from ‘Sunshine and Smiles’ who no longer have a website, but I’ve referenced the pinterest post. I was looking for composition inspiration here and like how the end of the spaghetti is in focus but the rest is knocked out, using a large aperture.

f8c5874a9808240a183a75c0ec3d0668
Found on Pinterest https://uk.pinterest.com/pin/342062534173168138/

I decided to create a side on approach to the shot as opposed to top down, I felt this would help utilise my depth of field knowledge and quite a few of my shots to date have been top down. I created a set up using a grey sheet on a maiden and a small wooden table. I tied the pasta with some rustic string and got rid of the marble as it’s quite small and felt the perspective and lines would be distracting as more of it would be in shot.

Because I was dealing with depth of field I decided to switch from manual setting to AV which would set the shutter to gain the best exposure for me. I knew I wanted a small depth of field as I wanted to replicate the style of the shot above, with the focus on the end of the pasta and the rest knocked out. It varied between f4 – f5.6 depending on how zoomed in I was. Using AV also allowed me to focus more on the composition. I started with some portrait shots but the first was showing too much background, which wasn’t knocked out enough as the creases could be seen. I moved the table and pasta further towards the camera which allowed the background to drop out, allowing me to avoid getting the iron out! I started to add some props to the shot in the form of garlic! I felt it would help create more of a lifestyle shot like above. I continued to get a portrait composition to follow the line of perspective down the pasta but I had to hand hold to get the angle and was getting some camera shake, so decided to focus on a landscape composition allowing me to rest the camera on a table and get a little closer.

IMG_2931
Set up


The final shot can be seen below.

IMG_3033
Final Shot ( Not Retouched) ISO 800 55mm f5.6 1/30

I took this into Lightroom to enhance the shot. I cropped the image slightly to remove some of the grey background on the right hand side. I bought the exposure up slightly on all the shot and then hi-lighted the end of the pasta and increased the whites and shadows to make it pop even more.

IMG_3033RT

Overall I’m pleased with the shot. I like the effect I’ve got using natural day light and how the texture of the table and the shadow around the front of the pasta leads your eye down the shot into the pasta and touching on the garlic. – I’m pleased the colour and texture of the garlic is still visible and complements the composition. I think the shot shows a successful use of shallow depth of field. If I was to do it again I would maybe think about using a tripod to try and achieve the portrait shot I was originally going for. I would also consider using a more rustic table or a bigger lump of marble as I did like the original Italian looking marble route.


Carbohydrates – Pasta. Test & Final Shot

High Key Portraits

Below are a selection of high key portraits and some of the steps used to achieve the image. High Key is a term which refers to bright white. We looked at different lighting set ups to create different shadows on the face and the technical terms involved.

The main lamp on the largest side of the face is referred to as ‘Broad light’.
The ‘short light’ is then used to fill the smaller side, usually with a soft box. Alternatively a fill board can be used to reflect the light from the broad light.

We looked at the shadows that can be created on the face using different lighting, such as loop and close loop lighting where the nose shadow is present or joined with that on the short side of the face (same as rembrandt.) We also looked at butterfly or clam lighting which is when the lamp is place directly over you head and creates a shadow under the nose, but can be reflected with a fill board under the chin.


DSC_2793
ISO 200 85mm f11 1/125 Butterfly lighting with fill board

This is my favourite shot which has an alternative landscape composition purposely using some of the white space. I think the lighting here is really complimentary and soft. This was created with butterfly lighting and a fill board at the chest.

I like the idea of being able to create high key black and white photography like the below image of Keira knightly that sees high key lighting from above casting a shadow on her throat.


28b87daf81c42ec7c89c5ff97f76b782
Image found from Listal.com – photographer unknown


High Key Portraits

Veg- Mushroom. Final Shot

After doing my initial Mushroom shots, I decided that a little more light and a darker background would help the shot come to life, rather than it just sitting on white.

Using the Nikon D600 with macro lens in a light day lit room, I composed two final shots on a dark wood background. The first was the mushroom as a whole, which I’ve cropped square as it helps with the even composition. I had a relatively low ISO to maintain definition, but also gave me some additional light sensitivity against the dark elements in the shot. I was using what I felt was the slowest shutter speed I could being hand held at 1/50. I kept a mid range f6.3 as I felt it gave a reasonable depth of field, allowing the wooden backdrop to be knocked out slightly so not to distract from the texture of the mushroom. The white balance was on auto. I focused on the centre of the mushroom as it was the closest point to the lens allowing the rest to stay in focus; this is what I was having difficulty with last time during the test shots, keeping everything in focus and not having areas go soft. I also used a piece of white card as a fill board to bounce some light into the brown texture, which I think had worked well.

I think I could improve by using studio lighting which would allow a bit more creativity with the lighting, but given the set up I had I’m really happy with the shot.

DSC_3393RT
ISO 320 66m f6.3 1/50


I also used the same set up as above but changed the mushroom to appear like a sunrise in composition. I managed to maintain the focus on the white edge but keeping the brown texture sharp too, previously I’ve had trouble with this. The background is perhaps a little too knocked out, and a bit more texture would have been nice, but too much may have been distracting. If I was to do it again I would try and get more of the background in focus by using a smaller aperture, creating a wider depth of field.

DSC_3395RT
ISO 500 66mm f6.3 1/50
Veg- Mushroom. Final Shot

Fruit – Kiwi. Final Shot

After producing test shots of the kiwi I decided to create something much bolder and eye-catching like the example I found on shutter stock.

I did some youtube research on how to backlight fruit easily and created a set up using the glass from a  photo frame placed onto of a tungsten lamp and a thin piece of paper as the white background. allowing light to pass through.

I instantly turned the WB to incadescent as the camera would pick up the warm hue of the bulb. (You can see the effect the blue balance has on the photo I’ve taken of the set up, the area around the lamp is all blue, but the light appears white.)

I used the Nikon D600 and shooting with a macro lens at 85mm around 20cm from the fruit. I kept the ISO relatively low to maintain sharpness. I used a mid range shutter speed as I was hand held, the slowest I could go was 1/80, I’d have liked to go slower but didn’t have a tripod handy and was shooting top down so couldn’t use a prop. The f number was midrange at f6.3 as I din’t really need to take depth of field into consideration too much as the fruit is quite small and I was shooting flat top down.

I cropped into the final shot allowing it to fill the whole of the image. I also increased the saturation in photoshop just slightly to get a really strong pop of colour.

Overall I’m really pleased with the final shot, I love how the particles can be seen by the light shining through the thinnest parts. I also like how the seeds look encapsulated in jelly like juice in the bottom right. I think the shot could be improved by using a tripod, allow me to have a longer exposure time and stiller focus point. Slicing the kiwi a tiny bit thinner might help the colour pop too – although I could increase the exposure in Lightroom/Photoshop to help with this.

DSC_3453RT
ISO 200 85mm f6.3 1/80 WB: Incandescent
DSC_3458
ISO 200 85mm f6.3 1/80 WB: Incandescent
stock-photo-fresh-kiwi-background-supermacro-back-lit-97994426
ISO 200 85mm f6.3 1/80 WB: Incandescent
Fruit – Kiwi. Final Shot

Resources

Resources I use include:

  • Pinterest Moodboards
  • ‘Delicious’, ‘Jamie’s Food’ magazine subscriptions
  • ‘StockFood’ Website, Shutterstock
  • Helen Cathcart, Rosie Birkett, Francesco Tonellini
  • Fellow colleagues at work who have more photographic knowledge than myself
  • Rembrandt exhibition at Abbot Hall
  • You Tube tutorials
  • Adorama TV
  • Skill Share app
  • Adobe Lightroom and Photoshop

Out of these resources I probably use Pinterest the most to research concepts and styling for shots. From here I can encounter photographers work, although I feel sometimes I have to sift through amateur work that’s not always of a high standard. I feel it’s been most beneficial for the food photography side of my project. Similarly I’ve found the delicious magazine helpful for styling and looking at how they’ve generated focus on certain types of food. For example in my sprinkled scone shot, I felt this is something that would feature in the magazine.

In terms of developing my camera skills, my fellow colleagues have also ben very helpful as they’re a constant port of call when I’m stuck technically which allows me to develop my learning quicker than waiting a week to come to college and ask the tutor.

Resources such as you tube are also great when planning, or in the middle of a shoot and unsure on how to do something. I looked at the following  YouTube Clip which helped me work out how to create a make shift light box to back light fruit allowing me to get some really nice textures and improve my original kiwi test shots.

I’ve also used Skill Share tutorial based websites and app, which has aided my photography technically in terms of settings, anchoring information I’ve learnt in class. It also explores different equipment and set ups that are worth considering.

I use photoshop day to day in my job, but a new resource I’ve learnt about is Adobe Lightroom. I was sceptical at first as I felt photoshop was going to be the best tool on the market, however light room is a really simplified version and can see why photographers would use this tool to catalogue their work and be able to easily manipulate images without it destructing the originals.

Although I really like the Rembrandt theory of light in portraiture, I was less bothered about the exhibitionI went to at Abbot Hall in Kendal. I think this is just because fine art, although technically amazing, isn’t really my thing and find it hard to engage. However I did like the see the triangle on light on the cheek in real life!

I have access to shutterstock and ‘stock food’ image libraries and find them good to look at from time to time for inspiration, but sometimes I find them totally uninspiring with pages and pages of generic shots, but it’s nice to be able to go to get an idea of what’s out there and what people might buy in the industry. I think this is a resource I could live without.


Resources

Health & Safety in the Studio

During our lesson Dave set up studio equipment and pointed out a variety of hazards to be aware of. I am familiar with these as we have a photography studio at work and have had some basic training and had hazards pointed out before, but found it beneficial to run through these again. Below I have summarised things to be aware of:

  •  Studio and background stands should be screwed in tight and stood stable to avoid people tripping or falling over them.
  •  Lights should also be screwed tight and secured to the studio stands so that they cannot fall off causing bulbs to shatter or wires to pull mid fall.
  • Following on from above; lighting cables are also trip hazards and should be led away from areas where they would become hazards.
  • Electrical cables should only be used if in good condition. They can become an electrical shock hazard if handled or used inappropriately.
  • One I forget about the most; lamps can become hot after prolonged use and are seen as a burn hazard.
  • The studio is often in low light conditions and can make moving around hazardous if there is equipment or props left on the floor. Keep working areas clean and tidy and free of obstacles that may be seen as slip, trip or fall hazards.
  • Its also worth remembering to warn other people/models before using flash in the studio, some people can be light sensitive and flash photography can trigger medical reactions such as epilepsy.


———————————————————————–

Risk Assessment for a portraiture shoot in the Studio:

Identify hazard:

  1. Cables and Stands
  2. Flash lamp
  3. Darken Room
  4. Hot Lamp

Decide who might be harmed and how.

1-3 The model, photographer or anyone else on set.

4. The photographer shutting the set down.

Evaluate the risks and decide on precautions.

  1. Could fall over – ensure cables are led away from walkways.
  2. Someone in the room could be epileptic or light sensitive.
  3. Keep the light on until shooting begins to avoid tripping in the low light.
  4. Allow the lamp to cool before putting away.

Record your findings and implement them.

  1. Low risk providing the above precautions are considered.
  2. Low risk providing the above precautions are considered
  3. Low risk providing the above precautions are considered.
  4. Low risk providing the above precautions are considered.

Review your assessment and update if necessary.

All, A = adequately controlled

———————————————————————–

Bird of Prey Risk Assessment:

Click to access ra%20photography%20courses%202012.pdf

I have looked at the above risk assessment for the bird of prey trip and have picked out the following hazards and suggestions to eliminate any H&S occurrences.

Hazard: Car Park -Traffic entering and leaving site
Solution: Visitors advised to be cautious when moving across the car park, as they would in any other car park

Hazard: Student may startle bird or be alarmed at initial meeting or up close causing panic.
Solution:  Introductory talk  Clear, emphasised instructions as to correct procedure
 Clear practical demonstration prior to student attempt  Steady experienced bird

Hazard: Bird may bite at close proximity
Solution: Clear, emphasised instructions as to correct procedure  Clear practical demonstration of where to stand and how to present camera

———————————————————————–

Risk Assessment on Barrow Channel side:

Identify hazard:

  1. Parking the car
  2. Tide Times
  3. Surface underfoot

Decide who might be harmed and how.

The photographer

Evaluate the risks and decide on precautions.

  1. Traffic coming in and out of the car park – be aware of other traffic.
  2. The tides in the channel are fast moving and dangerous. Always check the tide times before planning to shoot on the Channel side.
  3. The wet nature of the channel side means sinking sand and and slippery rock surfaces are present. Always wear sturdy footwear and avoid if the area looks dangerous. Worth wearing the camera around your neck with a strap to allow you to drop the camera safely and catch your fall with both hands.

Record your findings and implement them.

  1. Low risk providing the above precautions are considered.
  2. Low risk providing the above precautions are considered
  3. Medium Risk

Review your assessment and update if necessary.

  1.  T = trivial risk.
  2. A = adequately controlled
  3. N = not adequately controlled, actions required (footwear check, signatures confirming footwear and channel times)


Health & Safety in the Studio

Fruit – Kiwi – Unit 2 Test Shots

Inspired by Francesco Tonelli and his close up detail work, I decided to take an interesting fruit, the kiwi, and capture it’s detail with a Nikon D600 with a macro lens. I was shooting in natural daylight and had a fill board to hand to knock back any shadows.

I started with some shots of the kiwi whole as the furry texture and shape, although fairly boring in comparison to the inside, still has some interest.  I was shooting on ISO 320 as I and had a 1/125 shutter speed which was fast but still allowing enough light in as the sun was getting brighter. I went for a f/8 aperture initially as a middle ground. I used the fill board as soon as I could see how dark the shadow was.

I then moved onto the cut centre. I found it quite hard at first as the centre was really wet and juicy and it was heard to know where to focus and get some nice detail.

I waited 30 minutes to let the initial juice to dry out a little. I felt the subject texture was more prominent and easier to focus on. See below. I made the aperture smaller to try and get more in focus and a wide depth of field, although shooting top down it probably didn’t matter too much. I used the fill board here too to eliminate dark shadows. The exposure could have been a bit brighter I think, but I didn’t want to slow the shutter down too much as I was without tripod, and didn’t want to up the ISO too much and lose sharpness. I could brighten in Photoshop if necessary. I could also crop in to the kiwi more eliminating the white space around the subject.

DSC_2973
ISO 320 75mm f9 1/125 with fill reflector on shadow


Below I dropped the f/number to create a wider depth of field, knocking out the secondary kiwi. I focused on the seed of the kiwi face in the foreground on the right hand side. It has picked up the detail and furry edge really well. I think it is probably a tad under exposed, even though I dropped the f/number to allow more light to come in, I compensated this by reducing the ISO., when really I probably could have left it at 320.

DSC_2986
ISO 200 75mm f7.1 1/125 with fill reflector on shadow

Over all I’m happy with the test shots but think there is probably a nicer more exciting way to shoot the subject and get even more detail such as this stock image from Shutterstock below. The item is back lit and really pops in both colour and detail.

stock-photo-fresh-kiwi-background-supermacro-back-lit-97994426

Fruit – Kiwi – Unit 2 Test Shots

Dairy – Egg-cellent – Unit 2 Test Shots

I think there’s something really nice about eggs. They look so smooth and have so many different tones. I’m trying to shoot food from different food groups and this would fall into the dairy category nicely. My other options were stilton or milk.

I started with some test shots using the Nikon D800 with a 85mm macro lens in daylight/cloudy day.

I started with a top down composition IS0 200 85mm f5.6 1/60, the shutter is quite slow to allow enough light in but I dropped this to 1/50 as felt it was slightly over exposed.

These were slighting too dark so I dropped the ISO to 125 which gave me an exposure I was happy with. (Below) I also like the lighting and shadows. I considered using a fill board but felt it would make the image flat.

DSC_2925
ISO 125 75mm f11 1/50


I then moved on to a side on approach which I liked also. I set the ISO to 200 and the shutter to 1/200 which was much faster than previous as the sun was coming in and out thus brighter, so needed to stop as much light going into the lens. I kept the 5.6 f stop to allow some shallow depth of field, the main focus being on the front speckled egg. I like this shot but think it could be stronger – I was going for a 2/3rd composition but I think the exposure is too dark and the background is distracting.

DSC_2942
ISO 200 52mm f5.6 1/200

I’ve gone for a close up of the speckled egg here with a shallow dof using an f/5 aperture knocking the other eggs out. However, the shot could have benefited from the ISO being increased allowing more light sensitivity and a better exposure.

DSC_2952
ISO 200 52mm f5 1/200


I think my test shots have allowed me to think bit more a bout composition and colour. The white marble is nice, but I think a really dark background might allow the eggs to stand out a bit more. Maybe a more creative composition, or some unusual looking eggs. I looked at the work of David Griffen who specialises in food photography. He has a great shot of normal and quail eggs below. The dark background allows the eggs to pop and the studio lighting really makes the difference. I think using this as inspiration will enhance my skills.

David Griffen
David Griffen

Another nice example is on Getty Images which is a stock image but showcases an array of different eggs on black using nice studio lighting, casting nice shadows.

183743013
Getty Images


Another option could be to use a low key approach with a black background such as below, by Francesco Tonelli. The composition is a a third at the bottom of the image and the light coming in from the right is casting lovely shadows.

Screen Shot 2016-06-16 at 17.30.49
Francesco Tonelli

The basket of eggs below is also quite nice, although I think less interesting than the above options.

Screen Shot 2016-06-16 at 17.30.13
Francesco Tonelli
Dairy – Egg-cellent – Unit 2 Test Shots